

CLIPPERS + LIMITERS = MEGA LOUD!
Share
VIDEO TRANSCRIPTION
Welcome back. Today, I'm going to tell you the difference between clipping and limiting. Why I use them? Why they're super important? And why you should be using them? I've been mastering for over 25 years. I've probably mentioned that in a video once or twice before. And when I started, we didn't really limit things. Now, the reason why that was is because we were going to vinyl going to CD, you didn't have to be super loud. So basically, you would just go into the track, would just go into the limiter. And it would just shave a little bit of the top off, just so that it you were making sure you weren't going over the peak. And that was the main thing. So that's why CDs from the 90’s are probably 5 to 10 dB quieter than tracks you hear today.
And then along came the TC finalizer and that changed it all for everybody because people started using it in their home studios. Home studios started coming more and then things started getting smashed. And that's why we got the loudest wall. That's why everyone got super loud. Everyone's always wanting to be loud. But why does that mean that clippers and limiters get you loud? Well, the whole point is a limiter by definition is a compressor, but it's very fast compressor and it's supposed to be able to get the track brick walling, which means there is zero or wherever you want to set out to. And then it goes in and he just keeps pushing in and pushing in and pushing in. So you want this brick wall limiter to be super transparent. That is what you get from a limiter. You can change loads settings for different genres, different tracks sounds so that you can get it sounding as transparent as possible.
So one of the things you want to be able to do as a mastering engineer, as a good mastering engineer, is to be able to use the limiter really well. So that it's super transparent. So that you can push things into it. Still sounds loud, still sounds dynamic. That's what you want from a limiter. Now clippers, very similar to a limiter. They're putting gain on, but what they're doing is where they've got the peaks going up. They're just cutting the peaks off. And by cutting the peaks off, they're adding distortion. They're adding saturation. They're adding that sound. So what you're doing as it goes through the peak goes through the point that you set the threshold, it just shaves the peak off. It doesn't push it back. It just shaves it off. So what happens is the more you push into it, it starts distorting more and more.
Now that distortion can sound good because you really like that distortion sound. You really like the way that clipper is making it sound. But it can also on some systems sound really bad. Because if you use it in a bad way, same with the limiter, is just going to sound crushed, distorted and horrible. Let's dive into the computer. Let me show you an example of a clipper and a limiter, and then I'll show you how I use them in a very basic way. You'll be able to use them in this way, and then you'll be able to get your stuff pretty loud and also dynamic. So let's chat, let's get stuck in. But before we get stuck in, make sure that you have turned the like thumb below blue, that really helped me out. I'd really be happy if you did that. So if you liked my content, please make sure you do that. Making sure you subscribe. Because as soon as I hit 50,000, if it’s before Christmas, I'll be giving away a Maselec EQ. So make sure you subscribe. Now, let's get stuck in here.
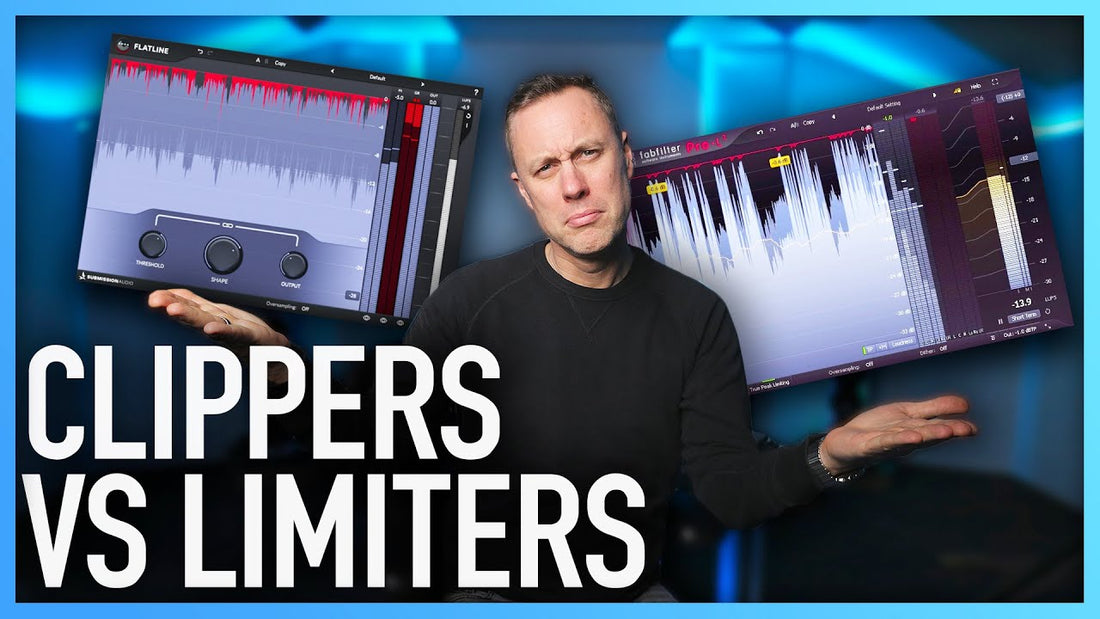
We are in Pro Tools. So I'll show you different clipper and limiter and show you the difference between the two. We have a track here sent in from a viewer. (Music playing). I know people have been saying, you're always using the same tracks. If you want to send me any tracks, please send them to demos@streaky.com and then I'll feature them on here. If you've got any bands or anything like that, that'd be cool because most people are doing electronics things that they sending in. So happy to use anything. So, what is a limiter? Think of a limiter as a brick wall limiter. Limiters are supposed to be super transparent, which is why you have different lease attack times. It's a compressor. So that's why you have got attack times. Look ahead. Things like that. There's all these limiters have different features. This is the Pro-L standard in the industry.
This is pushing the sound into this. So because it's a brick wall limiter, we're pushing the sound in to the brick wall. So think of it as distorting into the brick wall. So as we play the track (music playing), we're just going to start lifting the gain on the input to push into the limiter. We're then going to change the settings on the compressor part of the limiter, if you like to get this sounding so that it's as transparent as we can possibly get. Not going to just get into different settings here. But usually what I found is that the default settings were always pretty good to start with because obviously if you're a plugin manufacturer, you want you to default, as soon as someone turns it on to be top-notch. Always, actually with this Pro-L, I always have it in default setting.
I don't even bother using anything else. I bring the release time down and play with the attack and stuff. But the look ahead is usually okay. True peak, I always have the oversampling. I said I wasn't going to get insane, but that's the basics. And then I play around these got different algorithms. Now you'll see this on loads of different limiters. You can use different limiters. You can stack different limiters. I’ll link a video above, to me doing that limited sandwich, which is pretty cool way of limiting. This is essentially pushing in and you can see it is pushing the spikes down. So that's what it's doing. It's crushing, we're crushing into it. (Music playing). As you can see, this is a really good demonstration. Obviously that's now the story's out there. You can see how it's pushing down the peaks. So it's getting the peaks and it's pushing them down. We're pushing into the ceiling, which is here. And then that is the gain reduction. That is pushing the peaks down.
Now that is a limiter. Now let's get on with a clipper. Now this is a clipper that someone in my Facebook group. Is a free group if you want to join it. There is a link below. They mentioned this a couple of weeks ago and I've been playing with it a little bit since. Really like it. It's a great little clipper. So what is a clipper doing? A clipper is, instead of, as you see here, this is zero. Now every time a peak goes over zero, the clipper will do, as it says, and literally cut it off. So let's just play this and I'll show you what I mean. (Music playing). So we've got the peaks here. Let's just bring the threshold of the clipper down and anything that happens above the threshold is essentially just cut off. Now why this is good is because you're not pushing. You're not changing the sound below the threshold. You're not pushing into anything. You're not adding gain. You're just bringing it down and you're clipping.
But because this has got a little link, it pushes the output up too. So as you're coming down, all of this space here is happening with the ouput. So you can see the amount of gain reduction is how much I'm taking off. And here you can see what's getting clipped. So clippers, basically, will add a bit of distortion. We'll add saturation. So the more you push them, the more saturated, the more thicker, the more crushed the sound's going to sound. It's still going to get distorted. But it's not going to be the same way. A good way to do this is it gives you a really good perceived level because you're not crushing into it.
So you can use a clipper before a limiter. So let's just show you how the clipped sound looks when you have it running before the limiter. So for this, I'll take the output to zero. So I'll unlink that and I'll bring the threshold down so that it is literally clipping, but not adding the gains. It's not making up for what we take, what we clipping off, what we're taking off the top here. And then you can see exactly how that looks in here. You can see that that is the clip signal there. It's just literally flat across. (Music playing). You can then bring this up and do the gain on here rather than doing the gain on the output there. I do the gain on the input. So we're taking the clip signal and we're pushing that in. The reason why this sounds good is because you've already got rid of the peaks. So the limiter isn't dealing with the peaks. The peaks have already been dealt with by the clipper. The clippers clipped all the peaks off, and then you just push the signal right up into the limiter.
So that's a really good way of using a clipper and a limiter together. But I like to use a clipper also at the front of my chain as well. Because then you can take off some nasty peaks so that when you're going into compressors, then those peaks, as I've just shown you here, then you're going into a compressor flat like that. So it's a really good way of getting something loud or perceived loud before you go into your equipment. So clippers are helpful. They are handy. They are overlooked a fair bit within mastering. But I use them a lot. I like them and using them in conjunction with a limiter is really cool.
But limiters are the main thing you need for mastering to get things loud. So limiters, learning how to use a limiter. I would say, get one limiter. Learn it really well so that you know the sound of it. You know what you're going to get every time. Maybe stack a couple. They all have their own sound. The Wave L2 had a certain pop sound. This has got a sound. So really is about using the same one every time, getting used to the sound of it, and then using it in combination with clippers if you need to. But sometimes the clippers can make everything sound a little bit flat and a little bit boring to your ear because it's got rid of the peak.
It's not always, okay, this is exactly the way you do it every time. Sometimes it can make the track sound a bit boring. So really you need to have a play with them. But I think that explains to the difference between clipping and limiting. If you liked this video, please make sure that you press the like button below. That really helped me out. And if you want to go more in depth with limiting, then follow the next video that's coming up. It's called the limiter sandwich. I think you're going to love it. It tells you a really cheeky little trick that I use for limiting a fair bit. So check that out now. See you on the next one.
